How to Make a Worm Farm What you'll need: - Containers
- Food scraps, old newspaper
- Worms (tiger/red type)
- Drill (with help from an adult)
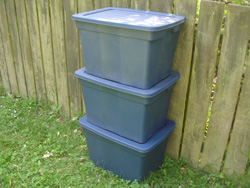
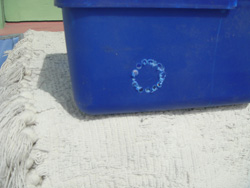
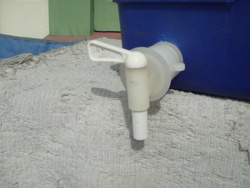
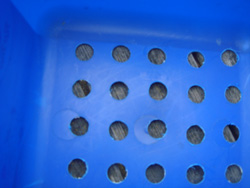
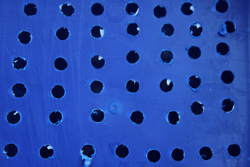
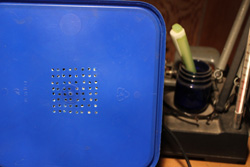
Containers: See what you can find: ice-cream containers, storage bins, fish crates, even an old bath! It will need good ventilation, drainage, and a lid. Use dark coloured bins as worms don't like light. Nesting storage bins come in lots of sizes and are much cheaper than a commercial worm farm. With two containers, one for the worms and scraps, and the other for the worm juice (liquid) that drains out of the bottom of the worm bin, you will have a single layer. With a third bin, you can rotate the top two in a continuous cycle. It's easier to remove the liquid if you have a tap (spigot) on the bottom bin. Plastic ones are cheap. Make a hole near the bottom of the side using a drill with the correct size bit if you have one or a circle of small holes smoothed off with sandpaper to fit it. Without the tap, you will need to lift the top layer(s) off to get the liquid out. That's ok, but it can be heavy. With two of your three bins, drill holes about 12 mm (0.5 inch) in the bottom for ventilation and draining the worm juice. Two of the lids need 6 mm (0.25 inch) holes, either in patches or randomly. A 35 litre (10 gallon) container lid needs at least 250 holes. The third lid (for the very top), needs four patches of 2.5 mm (0.1 inch) holes, one near each corner, 8 rows of 8 holes. These are breathing holes. Worm bin: Cut some newspaper into strips, soak it in water, and place in the bottom of the worm bin with old leaves and some soil. This is the bedding. Add tiger/red worms, about 1000 (400g) for a 35 litre (10 gallon) bin, and some food scraps. Cover with soaked newspaper (about 40 sheets thick) and a lid. Begin with just two bins: the bottom one for collecting the liquid and the other (the working bin) for the worms and food. When the working bin becomes full, with the food mostly eaten, add some bedding and food to a third bin and place it on top. Remember, the lid with the small ventilation holes always goes on the very top. The worms will make their way up through the holes to the new working bin (following the food) and leave you with a bin of worm castes. Remove this bin when the worms have moved up. You can then repeat the cycle. Feeding: Worms will eat most vegetable and fruit scraps, shredded paper, grains, tea bags, coffee grinds, and crushed egg shells (good for calcium). If there is liquid with your coffee grinds on a regular basis, there will be no need to flush the bin with water. Avoid citrus, onion, meat, fats, oils, dairy products and too much bread. Clumps of grass clippings may generate too much heat. Feed regularly rather than in large quantities. Handy hints: The numbers and measurements suggested are general guides rather than exact specifications, so it doesnt need to be perfect. Chop food into small bits as it will decompose quicker. Worms love to suck on rotting waste, remember they have no teeth! Leaving scraps to decay for a few days before adding them will speed up the process. Place bins where they are sheltered from extremes of temperature and rain (avoid too much direct sunlight). Worms like variety and not too much of one type. Don't worry too much about other small creatures in the bin, they are usually harmless. Keep the bin moist but not too wet. Any worms still in the removed caste bin will dive down to avoid the light, allowing you to collect worm free castes from the top. The liquid collected can be very concentrated (you'll tell by the colour), so its best to dilute it (10 to 1 for strong stuff). Vigorously stir the liquid container every few months as concentrated sediment builds up.
Cut up an old polyester/cotton sheet and place it over the liquid bin lid, it will prevent any worms falling in. Some people add a couple of rows of very small breathing holes around the top of their bin sides. If you have to leave your setup unattended for a few weeks, it will be fine! The thick, wet newspaper cover not only stabilises the temperature, it also keeps things damp and becomes a favoured source of food. |